Fortress Windows
How To Improve Home Insulation With Quality Windows is a practical question for homeowners facing chilly rooms, rising energy bills, or summer heat near the glass. In 2026, better insulation is not simply a matter of buying the most expensive window. Frame material, glazing, airtight installation, and climate all affect performance. A double- or triple-pane unit can reduce heat transfer, but a poorly sealed frame may still let cold air slip past the trim. Small signs matter: a draft beside the latch, condensation along the lower edge, or faded caulk outside. A simple tissue test can reveal air movement around a sash, though it cannot replace a professional assessment. Check for water stains, too; they may point to an issue beyond the window itself.
This guide explains how to assess existing windows and compare upgrades using clear, verifiable details, such as U-factor, solar heat gain coefficient, and air-leakage ratings. It also considers repairs, weatherstripping, and professional installation, since replacement is not always the best first step. No single specification guarantees comfort. Room orientation, shading, humidity, and local weather change the result, and published savings estimates may not match every home. That uncertainty deserves attention. Product documentation and quotes that clearly describe installation work provide a sounder basis for decisions. Expect practical trade-offs, not a miracle fix. Better windows can help, but insulation also depends on walls, ceilings, and ventilation. This guide offers a realistic look at choices that can make a home quieter, more comfortable, and less prone to drafts.
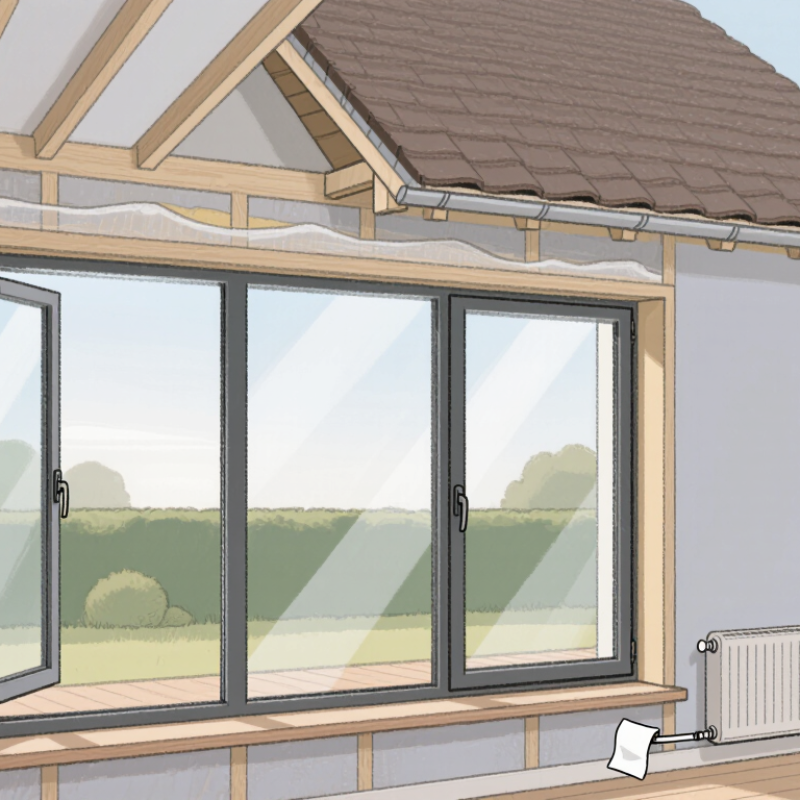
Quality windows can slow heat moving through glass, frames, and gaps around the sash. In winter, indoor warmth escapes toward colder outdoor surfaces; in summer, sunlight and hot air push indoor temperatures upward. Insulated double- or triple-pane units create a barrier between panes. Low-emissivity coatings also limit radiant heat transfer. The effect depends on the whole window, not just the glass.
Look at the U-factor to compare how quickly a window transfers heat: a lower value generally means better insulation. The solar heat gain coefficient shows how much sunlight becomes indoor heat. In a sunny room, that number matters. So does orientation. A south-facing window may benefit from different specifications than a shaded one. Small details count.
I used to focus on glazing and overlook the frame. That was incomplete. Frames with thermal breaks can reduce heat flow, while worn weatherstripping may let drafts sneak past otherwise efficient glass. A careful installation matters just as much; gaps around the frame can undermine good materials. On a cold morning, hold a hand near the edges and feel for moving air. It is not a formal test, but it can reveal a problem. No window fixes every comfort issue, and the best choice depends on climate, shade, and the home itself.
Assess each window on a cold or windy day, when air leaks are easier to notice. Move a hand slowly around the sash and frame, or hold a thin tissue nearby and watch for movement. Look closely. Check weatherstripping for gaps, flattening, or brittle edges, and note whether locks pull the sash snugly against the frame. A small draft can chill a room even when the glass looks clear.
Inspect the frame corners and sill for peeling paint, soft wood, or dark moisture marks. Open and close each window; sticking can signal wear or a frame that has shifted. Fog or droplets between panes often indicate a failed insulated-glass seal, while room-side condensation may reflect high indoor humidity and a cold surface. That matters. Record which windows feel cold, rattle, or show damage, and compare them on similar days. A simple inspection cannot reveal every hidden leak, and my first impression may be wrong. If moisture keeps returning or the frame feels soft, ask a qualified building professional to assess the cause before choosing repairs or replacement.
For better insulation in 2026, compare whole-window ratings, not glass descriptions alone. The U.S. Department of Energy estimates that heat gain and loss through windows account for 25–30% of residential heating and cooling energy use. Check the National Fenestration Rating Council label: a lower U-factor means less heat transfer, while the solar heat gain coefficient indicates how much sunlight enters. A sunny room may benefit from a lower SHGC; a cold, shaded room may need a different balance. A useful starting point.
Double- or triple-pane glazing creates insulating air spaces, and low-emissivity coatings help limit radiant heat transfer. Gas fills can improve performance, but the frame and installation matter too. Fiberglass, wood, and insulated vinyl frames generally reduce heat flow better than unbroken metal; thermally broken metal frames are another option. Look closely at the frame corners, sash, and sill. Small gaps can invite drafts.
ENERGY STAR reports that replacing single-pane windows with certified models can lower household energy bills by about 12% on average nationwide; actual savings vary with climate, home, and energy prices. That is useful context, not a promise. A caveat: I would not choose a window by one rating alone. Ask for the U-factor and SHGC, check the climate-specific criteria, and confirm that installers will seal the opening around the frame. Even a strong window can disappoint if air leaks around it.
A well-made window can still leak heat if it is fitted poorly. Before installation, measure the opening at several points; older homes often have uneven frames. Use the smallest measurement when planning the fit, and check that the sash opens and closes smoothly. A tight fit matters. But forcing a frame into place can twist it and create new gaps.
After positioning the window, secure it according to the installation instructions and keep it level and square. Fill the space between the frame and rough opening with low-expansion window foam or suitable insulation. Apply it sparingly. Excess foam can bow the frame, making the window difficult to operate. Foam alone is not an exterior weather seal, either.
Seal the outside joint with a compatible exterior sealant, and use interior trim or caulk to limit drafts indoors. The bead should be continuous, especially at corners and along the sill. On a cold day, feel around the edges for moving air or use a thin strip of tissue as a simple check. Small leaks can hide. I have to admit, a neat-looking bead does not prove the seal is sound; inspect again after the material cures, and repair any cracks or missed spots. If the frame is rotten, the opening is badly out of square, or water keeps entering, ask a qualified installer to assess the cause before adding more sealant.
| Area to Assess | Useful Specification or Check | Installation and Sealing Action | Why It Helps |
|---|---|---|---|
| Whole-window U-factor | Compare the certified whole-window U-factor on product labels. A lower value indicates less heat transfer through the window. | Choose a window suited to the local climate and applicable energy-code requirements; compare products using the same rating method. | Lower heat transfer can reduce winter heat loss and, depending on the design, summer heat gain. |
| Solar Heat Gain Coefficient (SHGC) | Check the certified SHGC, which ranges from 0 to 1. The appropriate value depends on climate, orientation, shading, and heating or cooling needs. | Consider low-SHGC glazing where limiting solar heat is important and higher solar gain where useful winter sun is desired. | Helps manage sunlight-driven heat gain without treating one SHGC value as suitable for every home. |
| Glazing and frame | Review the complete window rating and construction, including glazing layers, gas fill where specified, spacers, and frame type. | Use a complete, properly sized window assembly rather than judging insulation performance by glass features alone. | Heat can move through the glass, frame, and edges, so the whole assembly matters. |
| Opening preparation | Check the rough opening for rot, moisture damage, loose material, and out-of-square or out-of-level conditions. | Repair damaged framing and prepare the opening according to the window and flashing-system instructions before setting the unit. | A sound, correctly prepared opening supports a durable fit and reduces the risk of air and water leakage. |
| Water-management flashing | Confirm that the sill, jamb, and head flashing details are compatible with the wall’s water-resistive barrier. | Install flashing in the correct shingle-style sequence and follow the product instructions; keep drainage paths and window weep openings clear. | Directing water outward helps protect the wall assembly and preserves the effectiveness of insulation around the opening. |
| Gap between frame and opening | Use the clearance specified by the window manufacturer; do not force the frame into an undersized opening. | Fill suitable gaps with window-and-door low-expansion foam or another approved insulating material. Apply carefully to avoid bowing the frame. | Insulating the perimeter gap reduces drafts and heat transfer around the window frame. |
| Interior and exterior air seals | Use sealants and tapes approved for the substrate, exposure, and window installation detail. | Seal the interior perimeter for air control and complete exterior weather sealing as specified, while preserving drainage and movement joints. | Continuous, compatible seals help limit uncontrolled air leakage without trapping water. |
| Window operation and hardware | After installation, check that sashes open, close, and lock smoothly and that weatherstripping contacts evenly. | Adjust hardware and replace damaged or compressed weatherstripping; do not use caulk to seal moving parts. | Proper contact at operable joints helps reduce drafts while keeping the window functional. |
| Post-installation verification | Inspect seals visually and check for drafts under suitable conditions; a professional blower-door test can help identify air leakage. | Correct gaps or installation defects and confirm that the surrounding insulation and interior finishes are complete. | Verification can reveal leakage paths that are not obvious from product specifications alone. |
Note: Product ratings, code requirements, installation details, and suitable glazing choices vary by climate, building design, and local regulations. Follow the window manufacturer’s instructions and applicable building codes.
Window insulation can decline gradually, so routine checks matter. On a windy day, move a strip of tissue around the sash and frame. Notice where it flutters. Check weatherstripping for flattened sections, cracked seals, and gaps at the corners. Clean tracks so sashes close fully, and keep drainage openings clear. Small details count. Condensation needs context: moisture on the room-side glass can reflect indoor humidity, while persistent fog between panes may indicate a failed seal. Neither clue alone tells the whole story.
To evaluate performance, record indoor comfort and energy use across similar weather periods. A sudden rise in heating demand may have several causes, including drafts, thermostat changes, or attic leaks. That is easy to overlook. A home energy assessment can use diagnostic tools, such as a blower-door test, to locate air leakage more reliably than a quick visual check. Repair or replace damaged seals before assuming the whole window needs replacement. I used to treat every cold pane as proof of a bad window; that was too simple. Glass temperature, room humidity, installation quality, and nearby curtains all affect what you feel. Keep brief notes, and get qualified help when the source remains unclear.
Double- or triple-pane glass creates insulating air spaces. Low-emissivity coatings limit radiant heat transfer. Frames and seals matter too.
A lower U-factor generally means less heat passes through the window. Solar heat gain coefficient measures sunlight entering as indoor heat.
Yes. A sunny, south-facing room may need a lower solar heat gain coefficient. A shaded room may benefit from a different balance. Small details matter.
Fiberglass, wood, and insulated vinyl generally insulate better than unbroken metal. Thermally broken metal frames are another option. The frame is easy to overlook.
Replacing single-pane windows with efficient models may lower bills. One national estimate puts average savings near 12%, but actual results vary with climate, home, and energy prices.
Gaps around the frame can let drafts bypass efficient glass. Measure uneven openings carefully, and keep the frame level and square. A tight fit matters.
On a cold day, feel near the frame edges for moving air. A thin strip of tissue can also reveal a draft. It is only a rough check.
Use low-expansion foam sparingly; too much can bow the frame. Add compatible exterior sealant and an interior seal. I once trusted a neat-looking bead, but looks alone prove little. Check again after it cures.
How To Improve Home Insulation With Quality Windows begins with understanding how windows affect heat flow. In cold weather, poorly insulated windows can let warmth escape; in hot weather, they may allow unwanted heat inside. Check existing windows for drafts, condensation, damaged seals, and uneven temperatures near the glass. These clues can reveal where insulation is weakest and help determine whether repairs or replacement are needed.
Choose window types, glazing, and frame materials suited to the home’s climate and insulation needs. Energy-efficient glazing and well-insulated frames can reduce heat transfer, while careful installation and airtight sealing help prevent drafts around the edges. After installation, maintain seals, hardware, and glass surfaces, and monitor indoor comfort and energy use over time. Regular checks in 2026 can show whether the improvements are working and whether further adjustments could make the home more comfortable and efficient.